
Faux Leather Tutorial
Dark Arts Book
Making books look old is a passion of mine - a passion I want to share with you. There's lots of different ways to create a leather effect, this is only one of them.
For this project I chose the name Dark Arts for a bit of a Harry Potter reference. The sigil on the front is the Tree of Life symbol. I have included a clear image of it so you can print it off and use it yourself, if you are so inclined.

(finished)

I tried to take as many pictures as I could along the way and figured I should share it with you lovelies 
TOOLS:
-Glue Gun
-Paint brushes of various sizes
(especially a tiny one for doing lettering and one you don't care about too much for glue)
-Printer (and ink)
-Scissors
-Craft knife (X-Acto Knife)
SUPPLIES:
-White glue (I prefer Weldbond)
-Glue gun sticks
-2 ply Kleenex (tissues)
-An old book (I happened to have a very thick book from the 1930's that was falling apart)
-Gesso
-Paint (For a brown leather, at least 3 shades of brown. I also used gold for lettering)
-A neat computer font
-Image of some sort of magical symbol
-Card stock
TUTORIAL:
Find a book! Mine was a rather old book that was destined for the trash bin. I needed something to play around with, and it fit the bill perfectly. It can be any size or thickness - whatever look you're going for.
You're going to mix together some white glue with water. I'm just sort of guessing here, but I think I used about 3 parts glue to one part water. To be honest, though - I just dropped water into some glue all willy nilly and mixed it up.
I separated the ply of the facial tissue, so it was really thin and delicate. Then I smooshed glue all over one area and pressed the tissue into it.

I made sure some parts were thicker than others, variegating it to create texture.

Cover the entire book - glue an area, then cover in tissue. After it is covered in tissue, brush the watery-glue mixture over all the tissued areas.
I covered the front, let it dry and then covered the side and back, letting it all dry.
I covered the front, let it dry and then covered the side and back, letting it all dry.

Once entire book is dry, you need to decide what you're going to call your book and what you want to have on the cover. I decided on "Dark Arts" (I think I was feeling a bit Harry Potter-ish)
The font I used is called "Black Castle" and can be found here: http://www.dafont.com/black-castle.font
The symbol I used is the Tree of Life sigil:
The font I used is called "Black Castle" and can be found here: http://www.dafont.com/black-castle.font
The symbol I used is the Tree of Life sigil:

But you can search Pinterest for your own. Here's my "Symbols" board on Pinterest if you want to have a poke through: http://www.pinterest.com/arachneawebb/symbols/

Cut out your image, as close to the line as possible. Get as intricate with your fussy cutting as you can - the more fussy-cut it is now, the better it will look in the end.
Then, glue the symbol to the front of your book. Then spread glue across the whole of the symbol, like so:

Also - this is my favourite glue. I Get it at Home Depot, though I'm pretty sure craft stores carry it, too. It's pretty solid stuff.

Now for the super-duper intricate bit! Heat up that glue gun of yours and get some sticks of glue set to go. Once your gun is heated and the card stock with the symbol is dry - we're going to glue the heck outta it!
I actually used some dollar-store magnifying glasses (pink ones!) to help me with this bit. What you do is trace over the symbol with your hot glue. Do a little bit, let it dry, do a little bit more - let that dry. Before you know it, this part is fin!
I actually used some dollar-store magnifying glasses (pink ones!) to help me with this bit. What you do is trace over the symbol with your hot glue. Do a little bit, let it dry, do a little bit more - let that dry. Before you know it, this part is fin!

Next comes pretty much the same thing, but on the spine and in title form! Print off the name of your book on card stock and fussy cut the heck out of it.

And theeeen, we also do the glue-ing bit with the title, just like with the symbol:

Now, if you're not already messy, it's time for gesso! Brush your gesso all over the dried hot glue symbol and title.
Wait for those to dry, and then grab some paint. I decided on a brownish leather look with a couple splotches of red. What I did was start with black - I painted the whole thing black. Before it dried, I used "burnt umber" brown and painted and mixed it in with the black. Once that dried completely, I added some splotches of "deep red", then used two lighter shades of brown to finish it off.
Everything after the "burnt umber" was dry brushed carefully on. For all of this, I used dollar store paint. It's a nice size and cheap (a dollar!). However, when it came to the symbol and title, I used my very lovely "Game Color" in Polished Gold.
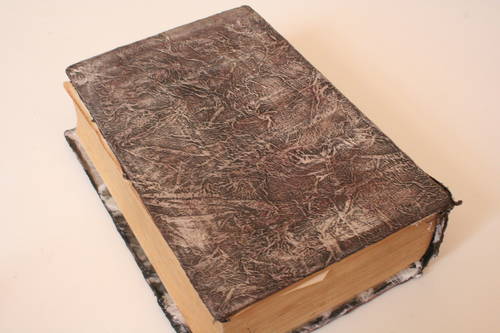
Here's some finished project images:
Everything after the "burnt umber" was dry brushed carefully on. For all of this, I used dollar store paint. It's a nice size and cheap (a dollar!). However, when it came to the symbol and title, I used my very lovely "Game Color" in Polished Gold.
Here's some finished project images:


No comments:
Post a Comment